CSS-Only "Tooltips"
Tooltips for Text Items (or a Single Tooltip on an Image):
Simply use a special class of linkBy which I mean, of course, an <a> element... together with an enclosed <span> element for tool-tips on text within a paragraph. It's as simple as this:
The CSS:
a.info,
a.info:visited,
a.info:active,
a.info:hover
a.info:link {
position:relative;
text-decoration:underline;
color:black;
font-weight:inherit;
}
a.info span{display: none;}
a.info:hover span{
display:block;
position:absolute;
top:1.5em;
left:0;
width:150px;
border:2px solid gray;
background-color:#dee;
font-weight:normal;
font-size:12px;
padding:4px;
text-decoration:none;
}
The HTML:
<a onclick="return false;" class="info">
tooltips
<span>
Tool-tips are pop-up text boxes that are used to add detail, descriptions, or definitions to text or images.
</span>
</a>
If you wanted to use this method on an image you would just place the appropriate image tag in place of the "tooltips" text in the example above. Bingo, bango, done. Images can also be used inside of the pop-up tooltip itself, just FYI.
There are other methods for doing these single tool-tips, but this method spares us the headache of trying to hack for the faulty hover support of non-<a> elements in IE6 and lower. This is ready to go, right off the bat and is very simple to do. The one argument that can be raised is that it is not fully "semantic," however some developers may not care as much about that as they care about valid code and support for all users, not just those with javascript enabled. While definition lists are probably the most semantic way to do tool-tips sans javascript (and I have done them this way before), they do NOT validate inside of paragraphs, headings, or many other elements that would commonly contain the text we wish to add the tips to. Make the choice for yourself. It's your world!
Multiple Tooltips for Image Items:
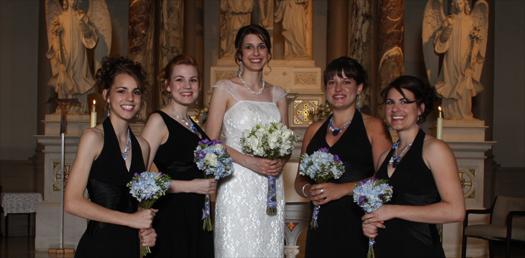
For tool-tips on images you need (at most) a <dl> or a pair of nested <ul> elements, some relative/absolute positioning, and a few <div> elements and you have the capacity for multiple ready-made "tool-tips" on a single image using nothing but HTML and CSS, both of which will validate just fine. No image maps required!

-

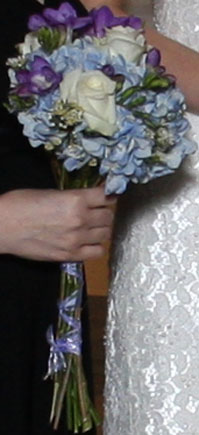
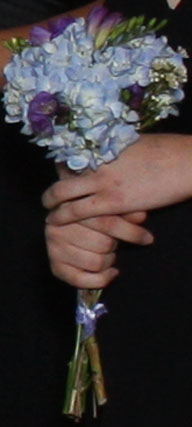
Bride's Maid Bouquet
- Flowers Used:
- A long list of flowers could go here...
- Dimensions (H x W):
- 16in. x 6in.
- Approx. Weight:
- 15 ounces
- Pricing:
- Varies by arrangement and season, as shown here: $12.75
-
-
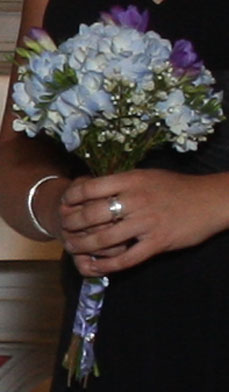
Maid of Honor Bouquet
- Flowers Used:
- A long list of flowers could go here...
- Dimensions (H x W):
- 16in. x 8.5in.
- Approx. Weight:
- 22 ounces
- Pricing:
- Varies by arrangement and season, as shown here: $16.75
-
-
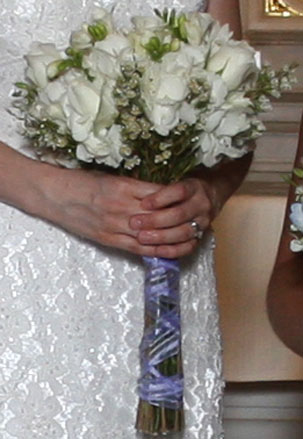
Bride's Bouquet
- Flowers Used:
- A long list of flowers could go here...
- Dimensions (H x W):
- 16in. x 10in.
- Approx. Weight:
- 30 ounces
- Pricing:
- Varies by arrangement and season, as shown here: $25.95
-
-
Bride's Maid Bouquet
- Flowers Used:
- A long list of flowers could go here...
- Dimensions (H x W):
- 16in. x 6in.
- Approx. Weight:
- 15 ounces
- Pricing:
- Varies by arrangement and season, as shown here: $12.75
-
-
Bride's Maid Bouquet
- Flowers Used:
- A long list of flowers could go here...
- Dimensions (H x W):
- 16in. x 6in.
- Approx. Weight:
- 15 ounces
- Pricing:
- Varies by arrangement and season, as shown here: $12.75
Hover over a bouquet above to view details!
It's probably overkill for a basic example, but this shows the potential that this method holds. You can hide any block level element you want here and size/position it any way you like - all without javascript. You can't ask for anything more, really.
This is the HTML structure:
<div id="showcase">
<img src="/images/group_shot.jpg" id="group_shot" alt="Bouquet Arrangements by Traci" />
<ul>
<li id="bridesmaid_1"><a><img src="/images/blank.png" alt="Bride's Maid Bouqet" /></a>
<ul id="detail_1">
<li>
<img src="/images/detail_1.jpg" alt="Bride's Maid Bouqet" />
<div class="detail_info">
<h3>Bride's Maid Bouquet</h3>
<dl>
<dt>Flowers Used:</dt>
<dd>A long list of flowers could go here...</dd>
<dt>Dimensions (H x W):</dt>
<dd>16in. x 6in.</dd>
<dt>Approx. Weight:</dt>
<dd>15 ounces</dd>
<dt>Pricing:</dt>
<dd>Varies by arrangement and season, as shown here: $12.75</dd>
</dl>
</div>
</li>
</ul>
</li>
<li id="maid_of_honor"><a><img src="/images/blank.png" alt="Maid of Honor Bouqet" /></a>
<ul id="detail_2">
<li>
<img src="/images/detail_2.jpg" alt="Maid of Honor Bouqet" />
<div class="detail_info">
<h3>Maid of Honor Bouquet</h3>
<dl>
<dt>Flowers Used:</dt>
<dd>A long list of flowers could go here...</dd>
<dt>Dimensions (H x W):</dt>
<dd>16in. x 8.5in.</dd>
<dt>Approx. Weight:</dt>
<dd>22 ounces</dd>
<dt>Pricing:</dt>
<dd>Varies by arrangement and season, as shown here: $16.75</dd>
</dl>
</div>
</li>
</ul>
</li>
<li id="bride"><a><img src="/images/blank.png" alt="Bride's Bouqet" /></a>
<ul id="detail_3">
<li>
<img src="/images/detail_3.jpg" alt="Bride's Bouqet" />
<div class="detail_info">
<h3>Bride's Bouquet</h3>
<dl>
<dt>Flowers Used:</dt>
<dd>A long list of flowers could go here...</dd>
<dt>Dimensions (H x W):</dt>
<dd>16in. x 10in.</dd>
<dt>Approx. Weight:</dt>
<dd>30 ounces</dd>
<dt>Pricing:</dt>
<dd>Varies by arrangement and season, as shown here: $25.95</dd>
</dl>
</div>
</li>
</ul>
</li>
<li id="bridesmaid_2"><a><img src="/images/blank.png" alt="Bride's Maid Bouqet" /></a>
<ul id="detail_4">
<li>
<img src="/images/detail_4.jpg" alt="Bride's Maid Bouqet" />
<div class="detail_info">
<h3>Bride's Maid Bouquet</h3>
<dl>
<dt>Flowers Used:</dt>
<dd>A long list of flowers could go here...</dd>
<dt>Dimensions (H x W):</dt>
<dd>16in. x 6in.</dd>
<dt>Approx. Weight:</dt>
<dd>15 ounces</dd>
<dt>Pricing:</dt>
<dd>Varies by arrangement and season, as shown here: $12.75</dd>
</dl>
</div>
</li>
</ul>
</li>
<li id="bridesmaid_3"><a><img src="/images/blank.png" alt="Bride's Maid Bouqet" /></a>
<ul id="detail_5">
<li>
<img src="/images/detail_5.jpg" alt="Bride's Maid Bouqet" />
<div class="detail_info">
<h3>Bride's Maid Bouquet</h3>
<dl>
<dt>Flowers Used:</dt>
<dd>A long list of flowers could go here...</dd>
<dt>Dimensions (H x W):</dt>
<dd>16in. x 6in.</dd>
<dt>Approx. Weight:</dt>
<dd>15 ounces</dd>
<dt>Pricing:</dt>
<dd>Varies by arrangement and season, as shown here: $12.75</dd>
</dl>
</div>
</li>
</ul>
</li>
</ul>
<h3 style="color:#777;width:525px;text-align:center;">Hover over a bouquet above to view details!</h3>
</div>
And this is the CSS that makes it all come alive:
ul, li, img {margin:0;padding:0;border:0;}
#showcase {position:relative;width:525px;height:508px;margin:0 auto;}
#showcase>img {position:relative;z-index:0;}
#showcase>ul {position:absolute;top:0;left:0;width:525px;height:258px;z-index:1;}
#showcase ul li {list-style-type:none;position:absolute;}
#showcase ul li a {text-decoration:none;display:block;width:100%;height:100%;border:1px solid transparent;}
#showcase ul li a:hover {background-image:none !important;display:block;width:100%;height:100%;padding:0px;border:1px solid orange;}
#showcase ul li:hover a {background-image:none !important;display:block;width:100%;height:100%;padding:0px;border:1px solid orange;}
#showcase ul li a img {width:100%;height:100%;}
#showcase ul li#bridesmaid_1 {left:124px;width:47px;height:92px;top:170px;}
#showcase ul li#bridesmaid_1 a {height:85px;}
#showcase ul li#bridesmaid_1 a img {height:92px;}
#showcase ul li#maid_of_honor {left:191px;width:44px;height:125px;top:137px;}
#showcase ul li#maid_of_honor a {height:95px;}
#showcase ul li#maid_of_honor a img {height:125px;}
#showcase ul li#bride {left:237px;width:59px;height:141px;top:121px;}
#showcase ul li#bride a {height:96px;}
#showcase ul li#bride a img {height:141px;}
#showcase ul li#bridesmaid_2 {left:298px;width:47px;height:116px;top:146px;}
#showcase ul li#bridesmaid_2 a {height:85px;}
#showcase ul li#bridesmaid_2 a img {height:116px;}
#showcase ul li#bridesmaid_3 {left:351px;width:42px;height:87px;top:175px;}
#showcase ul li#bridesmaid_3 a {height:80px;}
#showcase ul li#bridesmaid_3 a img {height:87px;}
#showcase div {padding:10px;background-color:white;height:230px;overflow:auto;}
#showcase>ul>li>ul {display:none;position:absolute;z-index:999;}
#showcase>ul>li:hover>ul {display:block;z-index:999;}
#showcase>ul>li>ul li {width:521px;height:250px;overflow:hidden;border:2px solid gray;}
#showcase>ul>li>ul li img {float:left;}
#detail_1 {top:90px;left:-124px;}
#detail_2 {top:123px;left:-191px;}
#detail_3 {top:139px;left:-237px;}
#detail_4 {top:114px;left:-298px;}
#detail_5 {top:85px;left:-351px;}
div.detail_info {text-align:center;}
div.detail_info h3 {border-bottom:2px solid #123456;margin-bottom:12px;padding:0;background-color:#dee;margin-top:0;}
div.detail_info dl, div.detail_info dt, div.detail_info dd {margin:0;padding:0;}
div.detail_info dt {font-weight:bold;font-variant:small-caps;}
div.detail_info dd {margin-bottom:10px;}
Some important things to pay attention to when customizing this for your own use:
- The <li> elements here are purposely given a height and position that allows them to extend beyond the <a> elements they contain. This allows a user to drag the mouse down to the pop-up area to select text, click any buttons you may have there, etc. -- this also means that hovering anywhere below one of the <a> elements will cause the popup to activate. This can look sloppy but it doesn't need to stay that way in your application.
- In this case the pop-ups were all stacked in the same location -- you do not have to make yours work this way. The popups can be placed a standard distance from the <a> element that activates them or can be allowed to simply appear just below the <li> element. Either option which would make setup a whole lot easier.


